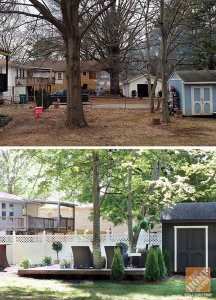
 Perhaps the most striking feature of Kristin Jackson’s recent backyard makeover is the island deck– or floating deck– she and her husband built. It’s a pleasant, shady spot in her backyard that incorporates the trees in its design. Kristin is an interior designer and author of the design and DIY blog The Hunted Interior, so it’s no wonder the deck not only looks wonderful, but it’s also so well constructed.
Kristin kindly offered to share her how-to for her deck… or maybe it’s more of a how-it-was-done. Either way, she offers some good ideas on how to build a floating deck similar to hers in your backyard, as well as some building and planning tips that come from her experience with this project.
Wanting to add some functionality and much needed curb appeal to our backyard, we decided to build an island (or floating) deck in between our existing trees. The landscape, or lack there of, provided a blank slate to create a backyard oasis to relax on.
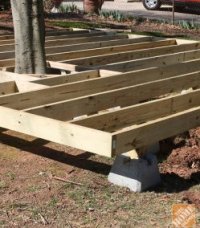
Our original plan was to build the one-level, step-up deck in between the four trees, but after trying to maneuver around the exposed roots, we learned our best solution was to shift the deck over and have the deck encompass one of our existing trees. This made our original straight forward square deck a little more complicated, but not too much.
We also considered the size and materials for the deck. We knew we wanted to use Veranda Composite Decking as the deck floor. This meant we would need more support to carry the weight, as well as the inherit flexibility these boards have. We also wanted to have as little waste as possible (and make fewer cuts!) so we decided to use the size of the existing boards and created a 16′ x 16′ footprint. This made life so much easier!!
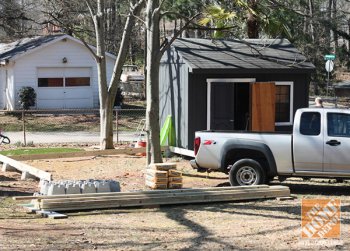
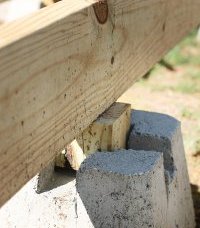
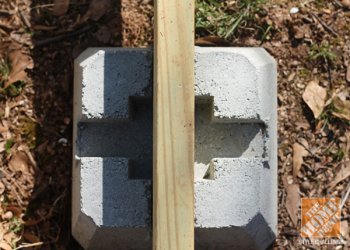
Once we determined our ideal placement, we leveled out our square exterior frame. Utilizing the concrete footings, we placed our pressure treated 2×6 lumber into the grooves to maintain their vertical position. Think real life Lincoln Logs.
To ensure your initial exterior frame is perfectly square, measure diagonally from corner to corner. Both of your measurements should be the same. Also, place a large level on all corners to insure you are level before continuing to the interior supports. The extra effort up front will guarantee a level and secure deck in the end.
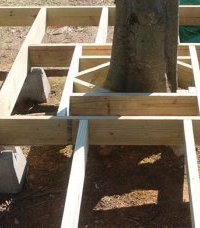
We marked out our interior support beams at every 16 inches and marked them on both sides of the frame. This helped in lining up and attaching the 2×6 boards. This also helped us to line up and lay out our interior deck footings. We laid them out as equally as possible, but we did have to shift some of them due to the exposed roots.
We attached our interior supports using deck screws from the outside of the frame into the supports. We then measured and cut our 4×4 pieces to fit where needed. The long 16′ supports went fairly quick thanks to our pre-planning. We worked from the edges into the center and left the blocking of the tree for last knowing that would require more thought.
 Wanting to create a frame around our tree, making sure we left plenty of room for it to grow, we placed perpendicular supports off of our interior support beams making sure to have them lined up with four of the concrete footings. We screwed them in and created an interior box to frame the tree. We then followed the shape of the tree by adding some angular blocking as well. Each tree is different, so just be sure to account for the shape and growth rate when considering this as an option.
A weekend later, a deck had begun to take shape!
The next weekend we began to lay the top decking boards. These composite boards are heavy and extremely flexible, so be sure to have help when moving these around. Your deck boards will lay the opposite direction over your support beams for added support. And again, using the 16′ materials we simply laid on the entire board and screwed them down. No trimming necessary.
We used the composite deck screws to attach our boards. This meant placing two screws per support beam. These screws also required pilot holes first, so we created an assembly line of sorts–I went ahead and drilled the pilot holes while my husband came behind to drive the screws in.
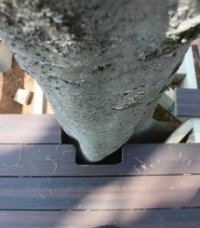
When it came to the tree, we trimmed our boards as close as possible and placed them as we would the other boards. We then later went back and used a jigsaw to cut out the hole following the shape of the tree. Each year we will trim the hole as needed as not to choke the tree.
After leveling our deck initially, we realized that one side of the deck had a comfortable step up, where the other side felt a bit too high. To keep our guests from trying to make the big step, we utilized landscaping both to help direct traffic as well as soften the look of the square deck.
We also used pavers and gravel to form a more formal entrance as well.
We’ve used other landscaping to disguise the exposed deck piers, and I also gave them a quick coat of textured spray paint to have them blend into the deck a little better. This helped a lot.
The actual build out of the deck took us two solid weekends and a babysitter. My husband and I did this entirely ourselves, so a few extra hands could have made this go a little faster.
